Blag's Homelab - Part 2 The Great Migration
Welcome to part 2 of my homelab tour, dubbed the great migration. This picks up five years after the events of part 1 and documents transition to Unraid.
Changes of note to the server were replacing a dead power supply I lost to a brownout, a lesson in timely UPS battery replacements. The other was adding another 8 GB of memory for a total 24 GB to create more room for activities and pairing that with an additional 500 GB SSD for VMs.
By 2019, I knew the clock was ticking on my two Hackintosh machines. My primary computer was not even UEFI capable and still used a legacy BIOS (curse you dual BIOS chip!), I had taken the Clover bootloader about as far as I was willing to go. High Sierra did not play well with my legacy BIOS machine and caused random lockups, so I chose to stay on Sierra. Nor was I prepared to roll the dice on upgrading my server, even if it was a UEFI-based system.
The fact that I held out until March 2021 is equal parts a testament to stubbornness and stability. Anticipating the move, I gradually whittled down the number of services I ran and no longer had any public facing services exposed in an effort to negate macOS Server’s slow death.
At the same time, there were several contributing factors from Apple’s side of the fence.
- The yearly OS release cadence became more disruptive with each new OS.
- Hardware commonality was diminishing, especially with proprietary additions like the T2 chip.
- ARM-based Apple Silicon meant the writing was on the wall for Intel and x86 based machines.
- macOS Server was no longer actively developed and would be discontinued in 2022.
A migration was inevitable, the question was to what and when?
When Work Meets Your Hobby
A lot can happen in five years. In the five years since I had built my original server, my day job went from working with Windows Server based environments to maintaining a complex Java and legacy software suite that ran on IBM’s distro of a Unix OS called AIX. The work grind had become tiring and fixing a rotation of the same problems downstream felt like I was getting nowhere. To anyone that has read “The Phoenix Project”, you get the idea.
DevOps was my ticket out, which seems obvious now, but a healthy helping of imposter syndrome does cloud your perspective.
Enter Docker
My recreational use of Docker would have to wait, but I did dive in head first with learning and quickly starting to apply it to work. I immersed myself in Docker over the next few months and soon found myself on a cloud migration team that had me writing containers, working with CI/CD, Kubernetes, Helm, and the overall deployment lifecycle. Terms like Infrastructure as Code and Config as Code now have real meaning. To boot, I had been daily driving an Ubuntu VM as my primary development environment.
I was hungry for new knowledge and a chance to make a difference further up the chain. I started asking myself these questions.
- How do you deploy something correctly from the beginning?
- The concept of desired state.
- What is the best way to bake in that configuration and maintain flexibility?
- Use variables.
- Where does automation fit in?
- Refine and automate manual steps.
Any new server project would need to cater to and support these concepts.
The Search for the Next OS
The next server build would have to be NAS centric, with other capabilities neatly slotting in around the storage layer.
The server had to be capable of the following:
- Linux based.
- Network Attached Storage (NAS).
- Docker server.
- Hypervisor.
- Simple to manage.
- Strong community base.
- Vendor support and consistent update cycle.
I had set up at least a half dozen Synology units in previous years and was a fan of their ecosystem and applications. They can even run docker. The deal-breaker for me was the cost of expandability, modest CPU specifications, and the performance limits those imposed. Especially when you have existing hardware on hand and are the avid build-it-yourself type. I err on the side modest overkill and like having room to grow.
TrueNAS was a familiar name I had come across on the interwebs and became my jumping off point for searches and comparisons. Proxmox wasn’t too far away in this search.
The next thing on my mind was space, 4 TB might have been enough back then, but storage was starting to get tight and decisions needed to be made. There is a reason RAID is the go-to method for achieving both performance and redundancy, but they are also not cheap to build or maintain. For the initial iteration, I wanted to reuse my existing HGST drives.
My search eventually led to Unraid, which basically ticked all the boxes. Its use of parity drives as an alternative to conventional RAID configurations, combined with the ability to mix and match drives was a big selling point. Not having to spin up an entire array to access a single file makes a lot of sense from a drive wear and power consumption perspective.
Test Benching
Next step, fire up the test bench. By this point my server was only doing light Emby duty, Apple Music has largely replaced at home music streaming, and Netflix could hold down the fort while testing out Unraid.
Bonus round: Apple Music released lossless quality streaming in the Summer of 2021.
A word to the wise, if you are going to be performing a lot of restarts, make sure to unplug the power and SATA connections on your hard drives. I learned this the hard way during some particularly spirited Hackintoshing performing what should have been a simple update. The result of that killed my media drive, I did have backups, but the fact remains. The lesson here, unplug your drives to avoid unnecessary risk and possible damage by spin down cycles. All it takes is one unlucky run, even though I was good about following my own advice in previous upgrade cycles.
Unraid
Unraid boots from a USB flash drive and runs in memory, with a few exceptions for writing plugins, configuration and Docker template files to the flash drive. I opted for a tried and tested USB 2.0 Sandisk flash drive that I had used for creating macOS bootable media.
From there it was a straightforward process of reading the [Unraid getting started guide](https://docs.unraid. net/unraid-os/manual/getting-started/) and watching some videos of Unraid in action. I recommend Spaceinvader One’s YouTube channel as a good jumping off point.
Areas of focus and testing included:
- Setting up SSD cache drives.
- Configuring and testing shares.
- Setting up and configuring an Emby Docker container.
- User management and permissions.
- Network configuration.
- I even managed to get my macOS SSD to boot as a VM.
I have a plethora of identical Kingston 480 GB SSDs, down to the batch numbers, the old school RAID array preference for closely matched serials and batches was met. It was only logical to lasso them into a RAID 10 array for the SSD cache and Docker storage. This was my cowboy YOLO moment.
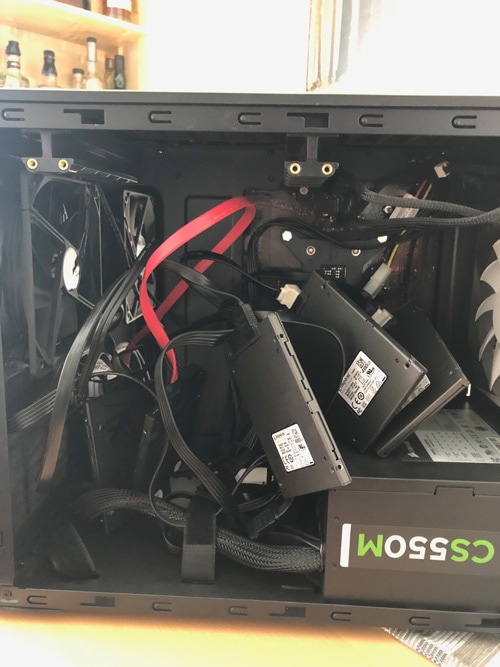
One thing I love about bench testing is getting to ask all the dumb questions up front (there is no such thing as a stupid question) and learning from any mistakes. Within two weeks, I was confident to go ahead with a full-scale migration.
The Great Migration
The first step of decommissioning my current server was to move all of my data to a holding area, so I could tear down and reformat the RAID 1 array.
Transferring Data
I have used Carbon Copy Cloner for years for everything from creating bootable backups to moving and backing up data using checksums. This also helps assuage my fears of bit rot and flipped bits in transit. Prior to my IT life my previous career was as a recording engineer, where I had built up sizeable number of audio project files that I did not want corrupted or watered down by generational copy loss.
Once the new shares were configured on the Unraid server, I migrated everything in batches based on the type of content and share it would be stored in. I used Carbon Copy Cloner to checksum the files, comparing them at the source and destination.
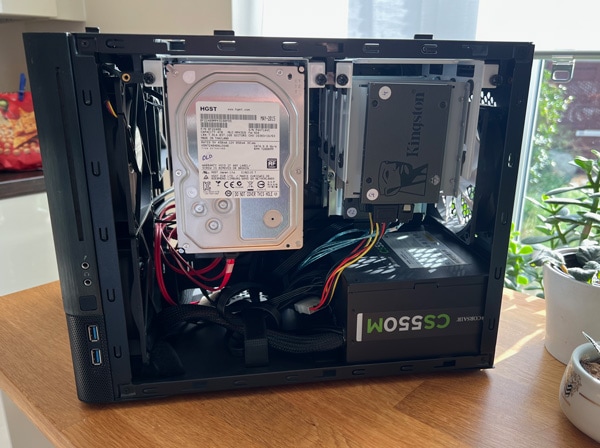 The finished server makes for a much more refined product.
Early Docker Stack
My first Docker container on the new server was Emby, because y’know priorities.
Not too long after my attention turned to all the possibilities the world of self-hosting had to offer.
My next project involved building out a Nextcloud and [MariaDB] (https://hub.docker.com/r/linuxserver/mariadb) installation. I have taken quite a liking to linuxserver.io’s Docker images, they are well documented and easy to use. The initial use case for Nextcloud was to replace my old SFTP server and provide the cloud server I use to host my WordPress websites a new destination to send offsite backups to. WEBDAV to the rescue!
Dedicated Game Servers
It is nice when you get time to enjoy your hard work. I started playing Space Engineers with a friend of mine and quickly grew tired of the high latency that came with hosting the game on their computer with a slow Internet connection. Rubber banding is not an acquired taste.
Unfortunately, Space Engineers does not have a Linux-based dedicated server and no officially supported Docker options. That is when I came across Devidian’s implementation of a Wine-based Docker steamcmd wrapper for the Windows Space Engineers dedicated server. Now, to get it running on Unraid.
Being still relatively new to Unraid and not having built my own template, I completely missed the “Add Container” option on the Unraid Docker page and instead found an existing XML template to clone and edit to do my bidding and run Space Engineers. I blame years of editing Java XML configuration files in Vim for this.
I have since then leveraged the same technique just through the GUI by using the “Add Container” option to customize an existing template. There is also a template authoring mode in Unraid that can be enabled.
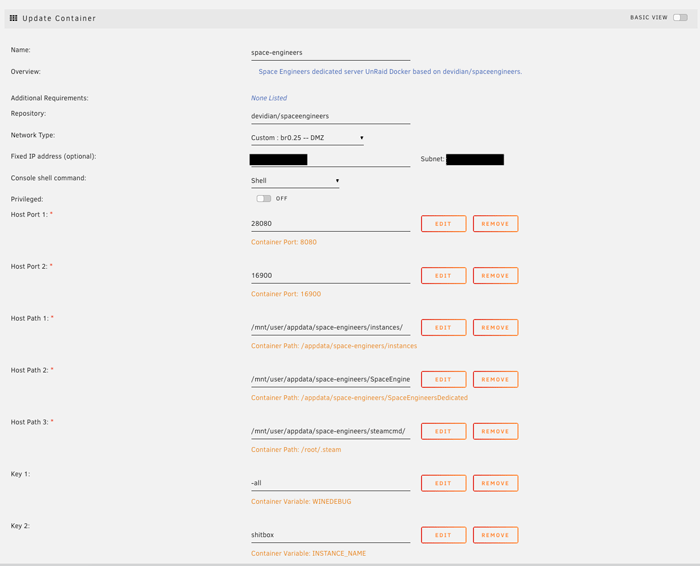 Space Engineers Unraid Docker template.
One addictive base building game deserves another, I made the move from playing Satisfactory solo and moving to multiplayer factory building shenanigans.
Unraid already has a template for ich777 steamcmd server for Satisfactory and was up and running with minimal effort.
Networking and Proxies
With Nextcloud running, I needed a simple, and not completely reckless, way of exposing way of exposing services to the Internet. Enter Nginx Proxy Manager and Cloudflare.
The goal was to buy myself time to research a more permanent proxy solution and segregated network configuration.
It was around then that I discovered Cloudflare’s maximum body size limit of 100 MB on the free tier when I found that some of the larger nightly backups were failing. It still made for a good learning experience and provided an opportunity to rummage around Nextcloud’s Nginx and PHP configuration while investigating.
It was not long after this that I needed to start leveraging more advanced proxy features. Personally, I found the same features that make Nginx Proxy Manager so easy to work with also work against it. I am not a big fan of adding code blocks to predefined fields through a GUI, mainly because it felt like I was depriving myself of the chance to learn the ins and outs of configuring Nginx.
I made the decision to switch my primary proxy to, you guessed it, Traefik!
Wait, hear me out! My reasons for the switch were simple in that I was looking for a capable proxy that used a more straight forward configuration model, in particular, I opted for Traefik’s YAML configuration file approach. Coupled with its tight Cloudflare and Let’s Encrypt integration and use of middlewares to create different site config combinations. I found myself in a good place to grow my deployment footprint. It was not long after that I integrated Crowdsec and the Crowdsec Traefik Bouncer plugin.
Network Security
Exposing services to the Internet carries a certain degree of risk, especially when using port forwarding.
Security and ogres have one thing in common, onions. They both have layers. Bad jokes aside, any sort of security should not rely on a single feature to prevent all attacks. Instead, several layers should work in tandem reinforcing each other. If one fails, another is there to help, and ultimately buy time. This is where logging, monitoring, and alerting come into play. You want your system to tell you when it’s under attack or deviations occur.
There are other options available besides port forwarding and easily enough for several articles. Specifically, private distributed networks, with Cloudflare tunnels and Tailscale being two of the most popular examples. These are topics we plan to touch in the future.
Cloudflare offers a variety of services, but is best known for their Domain Name Server (DNS) service, Content Delivery Network (CDN), and Distributed Denial of Service (DDNS) protection.
Crowdsec is an open-source community tool that checks incoming connections against a list of suspicious or banned IP addressed and greets offenders with a forbidden 403 code. Crowdsec is used to mitigate brute force and probing attacks, as well as malicious traffic from reaching your services. It works by checking the Traefik access logs, but can additionally parse a variety of application logs through the use of collections. These are community built add-ons that you can install to extend Crowdsec’s ability to identify suspicious patterns unique to those applications.
My setup leverages the following:
- Cloudflare’s firewall and DDNS protection features.
- Secure connections between Cloudflare and the Traefik proxy using signed SSL certificates.
- Configuring secure policies within Traefik, headers, content security, CORS.
- Parsing incoming traffic with Crowdsec and filtering out malicious IP addresses.
Monitoring
As the saying goes, monitor everything. Having previously used only proprietary, not to mention expensive, monitoring solutions at work. My homelab presented me an excellent opportunity to finally roll my own Prometheus and Grafana monitoring stack.
My first pass focused on surfacing host metrics using Node Exporter, available as an Unraid pluginand Cadvisor to monitor Docker container resource usage.

Grafana neatly slots in on top as the visualization layer.
There are plenty of community dashboards available to get you started and work with little to no changes.

We have an upcoming piece on the current state of monitoring across my homelab that dives into the nitty-gritty details.
Up Next: Part 3
Stay tuned for the next part in my homelab tour series where I make the switch to team red with the AMD 5900X and buy my first rack. Sneak peak below.
