
Last year I implemented some regular Internet speed testing using alexjustesen’s speed test tracker. My original configuration had scheduled it to run hourly tests, because who doesn’t love more data points? Not soon after came a “site slow?” email, where I immediately put the two together and scheduled a once daily test that was well outsite of regular operating hours.
Ever since I migrated all my hosted services in-house, site performance and bandwidth have always been on the roadmap. The biggest factor in holding off had always been bandwidth availability, a concern that went away once Gigabit Internet was available in my area and further alleviated when I had a second line installed to use as a failover.
However, the feeling of knowing that performance could vanish in an instant because of a Steam game download or any other service that could push high download speeds had me worried. Setting application traffic limits is a bandaid solution and not the final answer.
The work originally started as simple traffic shaping policies where along the way I encountered the term Bufferbloat and since then has been on my reading and to-do list.
What is Bufferbloat?
At a high-level bufferbloat is a sharp uptick in latency when too much data is buffered on a network device, in this case the router. This usually occurs when a connection’s bandwidth is saturated, creating a buffer or queue of data waiting to be transmitted.
A more in depth explanation is available here. The traffic analogy is apt by comparing bufferbloat with too many cars on a road and slowing traffic down to a crawl. Optimizing for bufferbloat means tuning your network highway to keep traffic flowing at a constant speed and as tightly as possible.
I have been using Waveform’s tool to test for bufferbloat on my network.
A common example from yesteryear was torrent clients bogging down an entire network. This usually occurred because all the download bandwidth was being utilized and caused any other download requests to queue and compete, leading to slow performance and high latency. The same can occur with upload links.
As time passed and download speeds increased, the above issue became less prevalent with a single download no longer being able to consume all available bandwidth.
A more modern example and one I encountered a few years ago was when seeding my offsite Backblaze backup. My upload speed at the time was only 20 Mbps, which Backblaze immediately proceeded to use every spare megabit it could lay its hands on. This triggered and extreme case of saturation where outbound requests queued up so badly that my download speed collapsed from 120 Mbps down to single digits.
Addressing Bufferbloat on pfSense
I consume my fair share of Lawrence Systems videos and posts either through his YouTube channel or the forums owing to how frequently they come back in searches. What can I say? I like quality, contextual content.
I followed the following guide from Lawrence Systems’ fixing bufferbloat, which references Netgate’s pfSense documentation for configuring CoDel Limiters.

Following the guide
The process is broken down into three parts:
- Creating a limiter.
- Adding a limiter queue.
- Creating a WAN floating firewall rule to route traffic through that limiter.
Creating and Configuring the CoDel Limiters
- Navigate to Firewall > Traffic Shaper > Limiters.
- Select “New Limiter”.
- Enable it and assign a name and description.
- Set the bandwidth, something below your maximum tested download or upload speed.
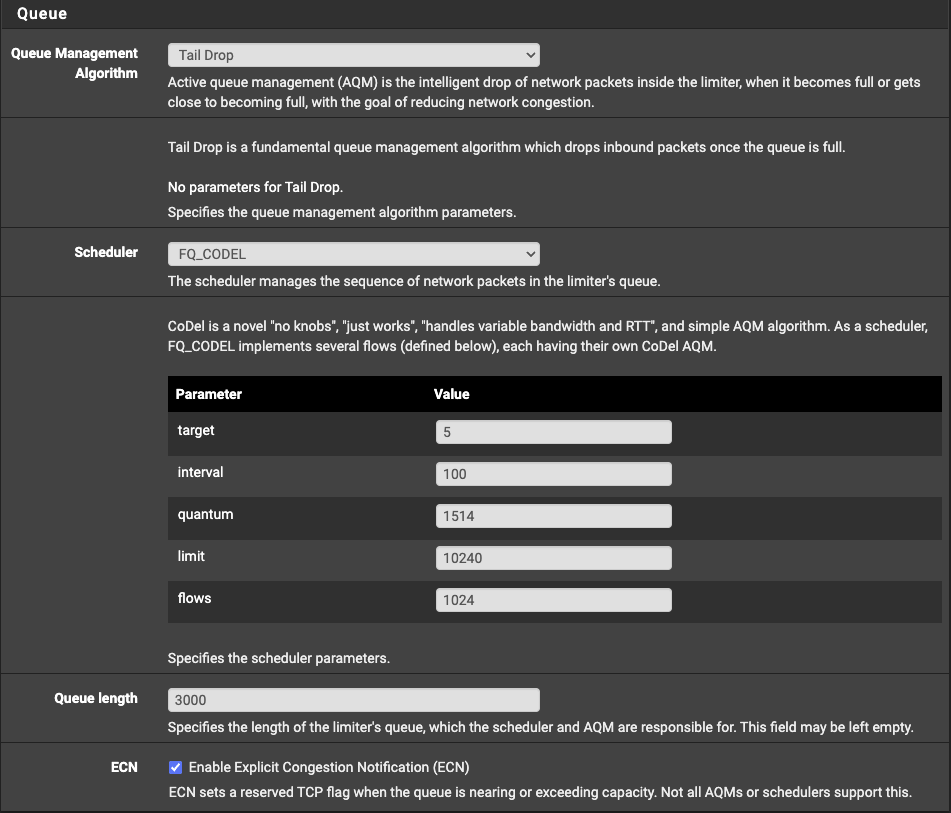
- Set the scheduler to
FQ_CODEL. - Set the queue to 1000, higher values can be used for faster Internet connections.
- Save your settings.
- Select the “ECN” checkbox.
- Save your settings again.
Enabling and Setting the Bandwidth Limit
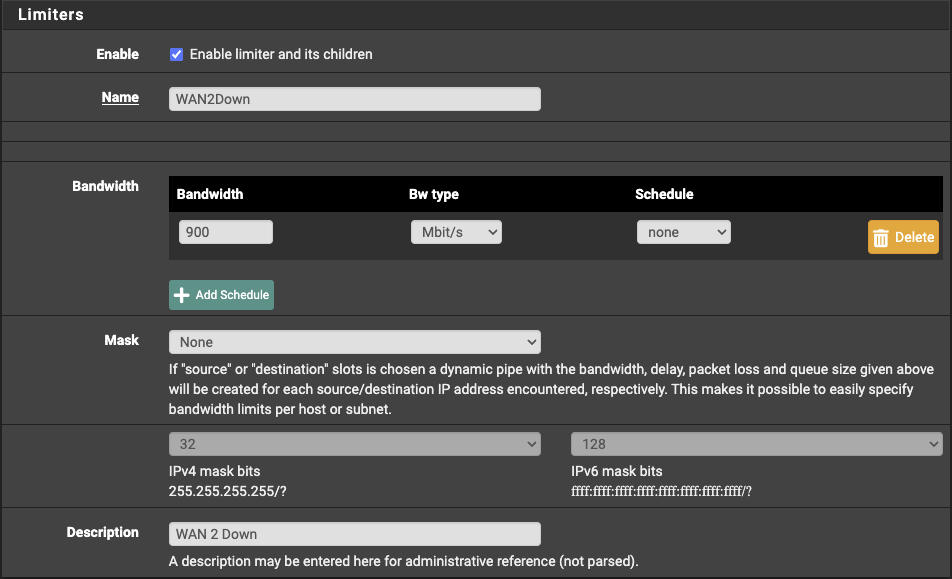
Setting the CoDel limiter.
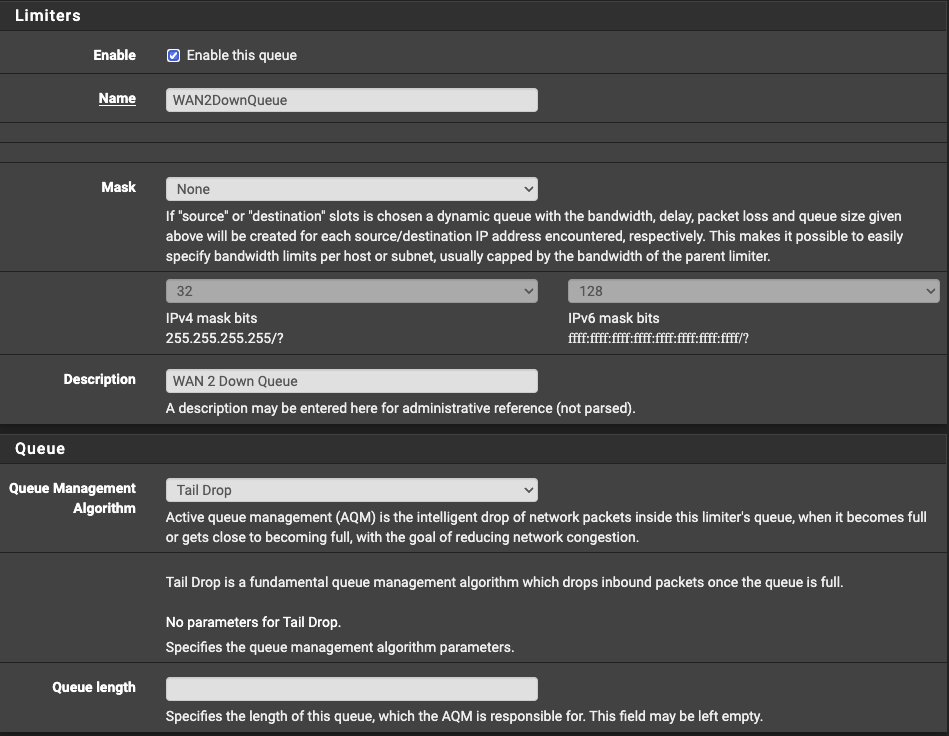
Adding a Limiter Queue
- At the bottom of the recently created limiter, select “Add new Queue”.
- Enable the queue and assign a name and description.
- Leave everything else with their default settings.
- Save and apply your changes.
Adding the Limiter Queue
Configuring Floating Firewall Rules
- Navigate to Firewall > Rules > Floating.
- Add a new rule.
- Set the action to
Pass. - Select the relevant WAN interface.
- Set the direction to
out. - Set the protocol to
Any. - Set the Source to
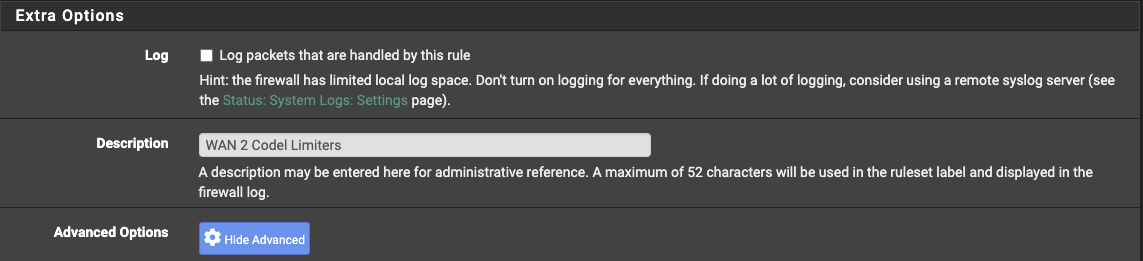
WAN Addressor the WAN interface you are using. - Add a logging description, you can leave logging disabled.
- Expand the Advanced options and scroll down to the Gateway section.
- Set the Gateway to the WAN interface being used.
- Set the In/Out pipes to match the Up and Down queues we configured earlier.
- Save and apply.
Creating a new floating firewall rule.
Logging description.
Configuring the firewall rule gateway.

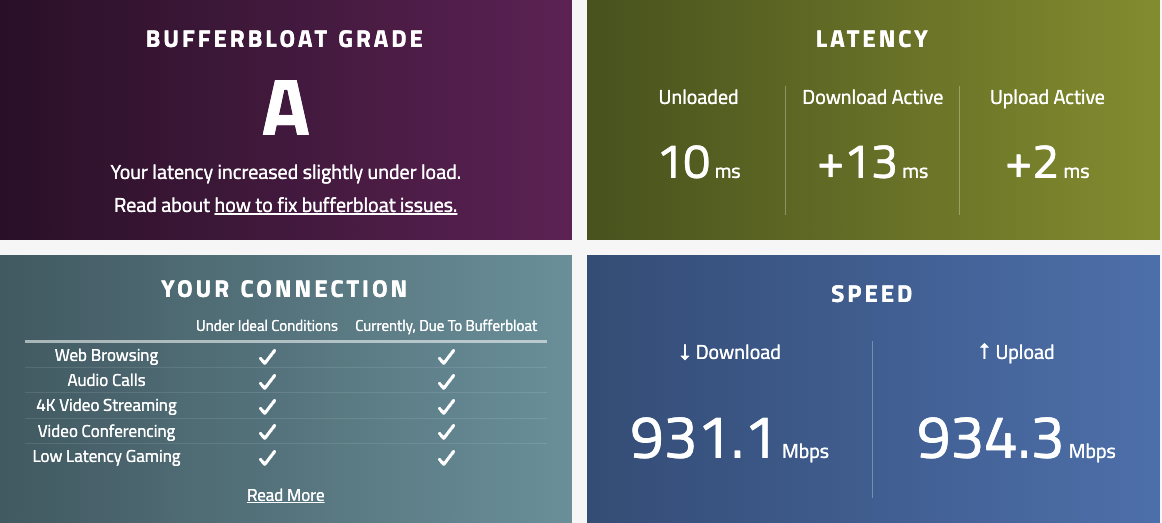
Before tuning the CoDel limiters
While 13ms of load latency might not appear like much, the fact that it can be reduced down to 2ms says it all. I find the current score to be on the optimistic side as I have seen this previously graded a B when I first tested back in December 2023.
I am currently using a Netgate 8200 MAX appliance and not entirely for the overkill factor. This no doubt helps to mitigate bufferbloat by virtue of abundant resources and bandwidth. This leaves plenty of room to grow in to as I continue implementing new features like failover WAN, Snort, management and backup VPNs, privacy VPN clients, and hosting more services.
My previous unit was an SG-2100, which was not able to route Gigabit Internet and capped out at 600 Mbps. Had the Netgate 4200 existed back then, I would have certainly gone down that path.
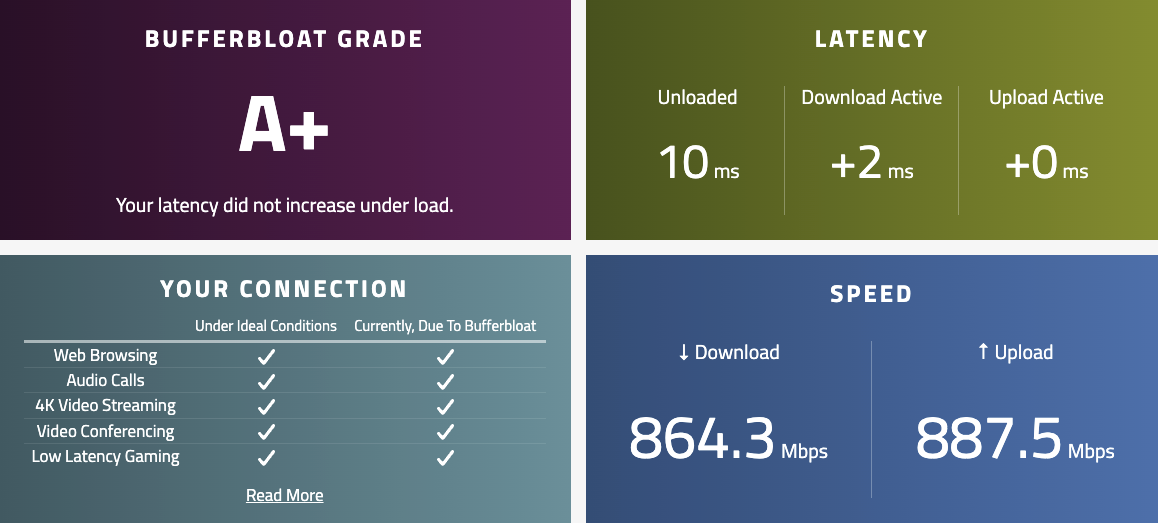
After tuning the CoDel limiters
Before testing, make sure that you are using a new firewall state otherwise the test will not use the new
limiters we configured. In my case, using InCognito was enough to generate a new firewall connection.
I configured the limiters to 900 Mbps* for the upload and download side for my primary symmetrical Gigabit WAN connection and set the queues to 3000 as per the documentation recommending a queue length of 3000-5000 for high-speed Gigabit+ networks.
*Update, I have been slowly moving speeds back up and have currently settled on a limiter of 920 Mbps.
A Note on Failover
My failover WAN connection is not symmetric and has 1 Gbps download, but 100 Mbps upload. I have left both the upload and download queue for that connection set to 1000. The upload limit is set to 88 Mbps, since its tested upload speed is usually around 92 Mbps.
Traffic Shaping
My first implementation of traffic shaping is fairly basic, designed to prevent human-operated networks from consuming too much bandwidth and impacting my hosted services. This has been configured against two interfaces/VLANs in particular, my IoT and trusted internal networks.
Interface Traffic Shaping Documentation
The following links are the two sections of Netgate pfSense documentation I consulted to configure traffic shaping.
A good place to start is the Traffic shaping basics.
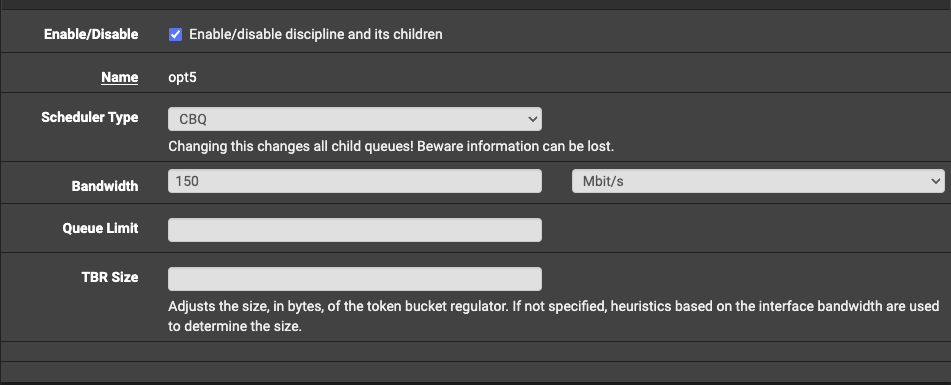
I opted for the CBQ [Scheduler type](https://docs.netgate.com/pfsense/en/latest/trafficshaper/altq-scheduler-types. html). The main reason for this choice is that CBQ allows for basic bandwidth limits to be used without the overhead of any additional tuning.
There is an option to use a wizard to create policies. I did not use it in this case.
Here is the traffic shaping rule I configured for my IoT VLAN and limiting all devices to a generous 150 Mbps. By
contrast, my trusted network is given a higher bandwidth in order to download larger files like games.
Closing Thoughts
Addressing potential performance bottlenecks is my preferred approach. While that does not mean we can predict everything, a proactive posture better prepares us for dealing with the unknowns when they do finally happen.
I hope this article has helped you identify some areas of improvement within your own network and encouraged you to tackle bufferbloat.
My next steps will be to research and implement some more advanced traffic shaping policies that go beyond bandwidth limits.

