Configuring WAN Failover on pfSense
I recently found myself with two Internet connections at home. A new ISP just rolled-out service where I live, and one thing was for sure, I wanted the symmetrical gigabit fibre they offered. I decided to keep both lines instead of paying some steep termination fees. There was more value in configuring the new line to fail over to the other in the event of an outage.
The original line is also fibre, but lacks symmetrical upload speeds. While I do get 1 Gbps download speeds, the upload speeds are a paltry 92 Mbps and realistically more like 88 Mbps.
Both my wife and I work from home and losing Internet connectivity is just as bad as a power outage. The Virgin Media outage in April 2023 proved as much.
I appreciate this is not going to be a common solution for residential, or even most homelab users and is much more applicable in business and commercial environments, I just could not resist the opportunity.
My Case Against Load Balancing
The majority of this setup can also be applied in a load balancing configuration. I simply did not want to deal with the headache of presenting websites on two public IP addresses. Load balancing does not achieve any performance gains by strapping two gigabit connections together, the connection will not behave like a 2 Gbps pipeline.
Assigning an Interface
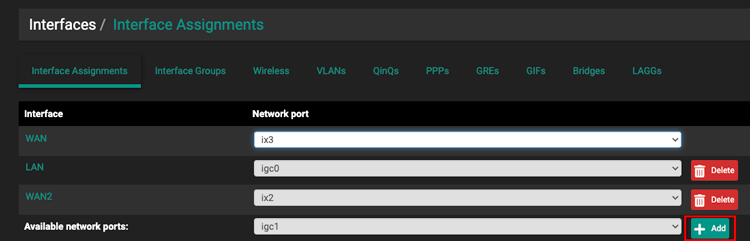
We will first need to assign the new WAN interface.
- Navigate to
Interfaces > Assignments - Select the physical port you wish to use* and click
Add.
The new interface should now be visible in the Interfaces menu.
*My router has several dedicated WAN ports, you may have to assign another Ethernet port to function as WAN port.
ISP Config
Depending on your ISP, the two most common methods of connecting are DHCP or PPPoE. This section glosses over the high-level requirements to set up an Internet connection.
DHCP is common with coaxial cable and fibre Internet providers. For example, Virgin Media in the United Kingdom and Comcast (Xfinity) in the United States both use DOCSIS networks that use coaxial cable. The only difference with fibre in this case is that you are trading away the cable modem for an optical cable and Optical Network Terminal (ONT).
DHCP configurations typically rely on MAC address authentication. If you have ever had to register a third party modem with your ISP, this is why.
PPPoE has been around since DSL and has seen continued use through new standards like ADSL+ and VDSL. The latter is known as Fibre to the Cabinet (FTTC) in the UK.
DHCP Settings
- Select the new WAN interface from the
Interfacesmenu. - Set the “IPv4 Configuration Type” to
DHCP. - If applicable, add your ISP router or modem MAC address *.
- Scroll down to the “Reserved Networks” section at the bottom of the page.
- Check
Block private networks and loopback addresses**. - Check
Block bogon networks**.

*If your ISP uses MAC address authentication, you will need to add your ISP router’s MAC address here. This configures the pfSense interface to impersonate the ISP supplied modem or router.
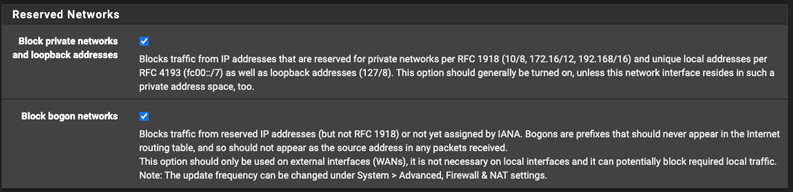
**The last two settings prevent private IP ranges from being accidentally exposed to the Internet.
PPPoE Settings
- Select the new WAN interface from the
Interfacesmenu. - Set the “IPv4 Configuration Type” to
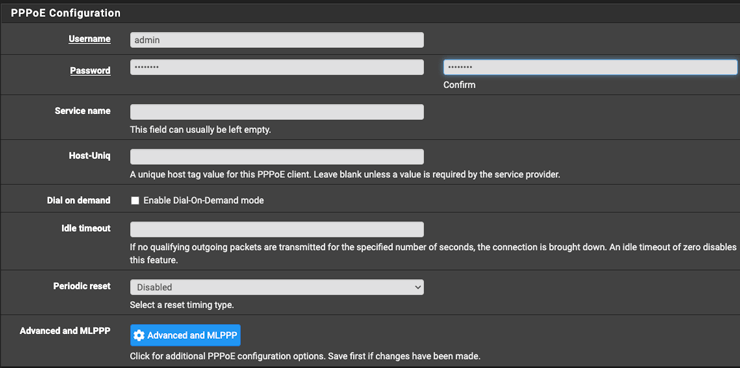
PPPoE. - Scroll to the “PPPoE Configuration.”
- Enter your ISP connection credentials*.
- Scroll down to the “Reserved Networks” section at the bottom of the page**.
- Check
Block private networks and loopback addresses. - Check
Block bogon networks.
*Check what credentials your ISP requires. Some only need the fields to not be empty, others need only username of admin and any password, some require a customer code.
**The last two settings prevent private IP ranges from being accidentally exposed to the Internet.
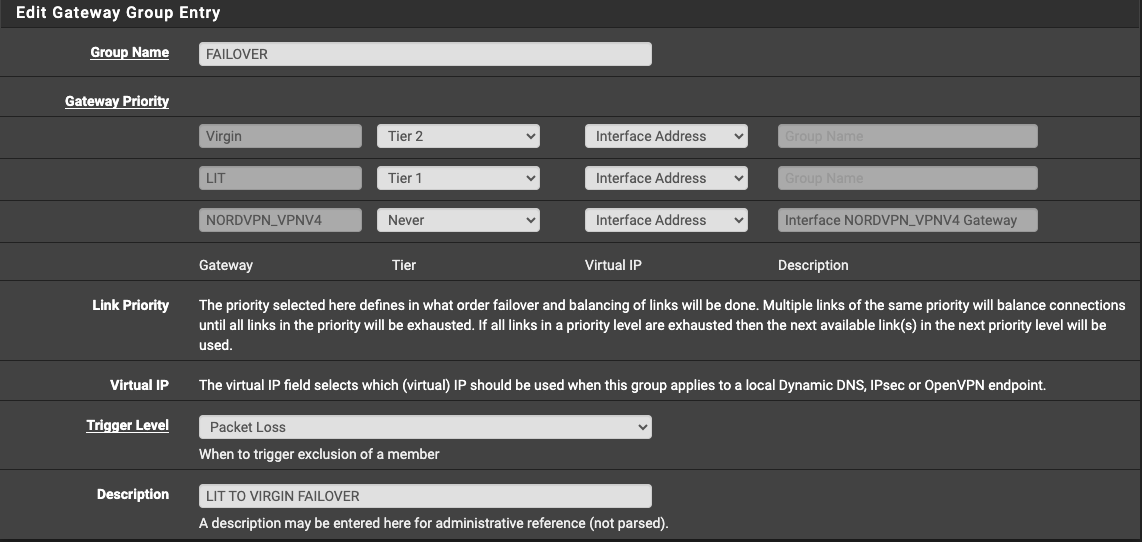
Configuring WAN Failover - Create a gateway group
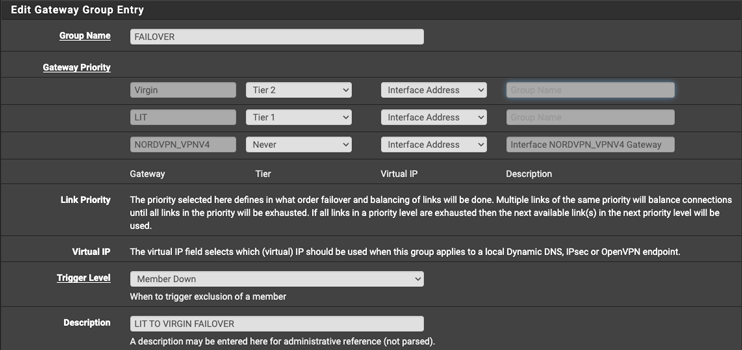
Creating a gateway group is crucial and where the failover is configured.
System > Routing > Gateway Groups
- Configure the gateway priority to set the tier 1 and tier 2 connections.
- Set the Trigger Level, I opted to Packet Loss over Member Down.
- Give the gateway group a description.
Update
I originally used the Member Down setting for the failover group.
During a recent ISP outage the failover did not work because the fibre ONT still had power and the interface was
active. Albeit, the interface led to an Internet black hole.
What made this fun was that I was out of town at the time and reliant on my management VPN connection. I was able to
change the gateway group setting to Packet Loss during the initial return of service.
I was then able to catch the failover kicking in while the primary connection experienced flapping.
DNS
Your shiny new failover group is going nowhere fast without DNS. Each WAN connection will require a DNS entry.
- Navigate to
System > General Setup. - Under the “DNS Settings” configure the entries, so there is at least one per WAN interface.
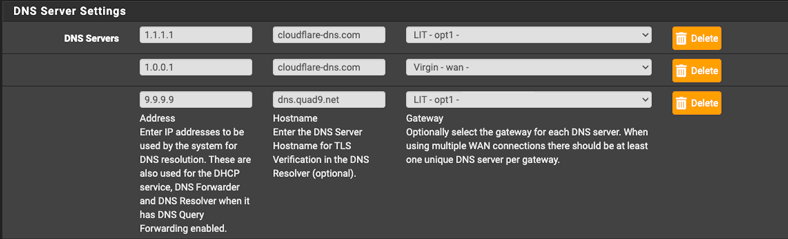
In my case, I have configured an DNS server for primary WAN connection that can be used as a fallback.
NAT Port Forwarding
Port forward cannot be assigned to a gateway group and uses the named interface, you will need to create additional entries for the new WAN interface.
- Under the
Firewall > NAT > Port Forwardmenu. - Create duplicates of any existing rules, except this time select the new WAN interface under the “Interface” option.

Optional Configuration
This being a homelab driven website, I would be remiss to gloss over the necessities like dynamic DNS (DDNS) or ad blocking.
A working DDNS failover solution was a major factor in opting to keep both Internet connections.
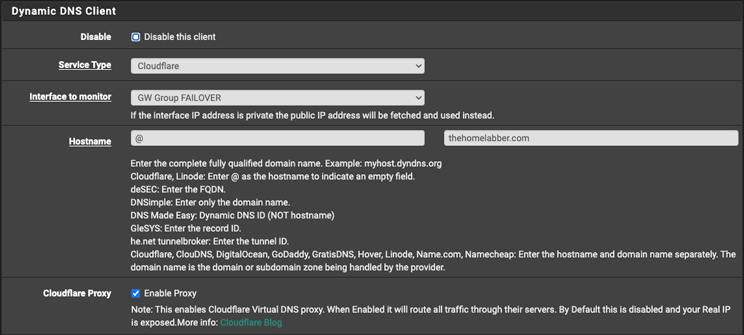
Dynamic DNS
pfSense supports a large variety of DDNS providers, more that can fit into a single screenshot and a lot of names I haven’t seen before. In my case, and for the purpose of this guide, I use Cloudflare for both DNS and DDNS.
By default, the dynamic DNS settings are bound to the WAN interface.
- Edit a DDNS entry and select the new failover group from the “Interface to monitor” dropdown.
- Save your changes.
You should see the IP address update, along with a green checkmark. If you encounter any errors, enable Verbose logging and check the logs in Status > System Logs > System > General for more context on possible causes.
A note on permissions, regardless of your provider, double check that any tokens and permissions are still valid. Where possible, limit permissions to the lowest required to update the record. It is best to avoid using account passwords or global keys.
For Cloudflare that would be an API token with Zone DNS editing permissions.

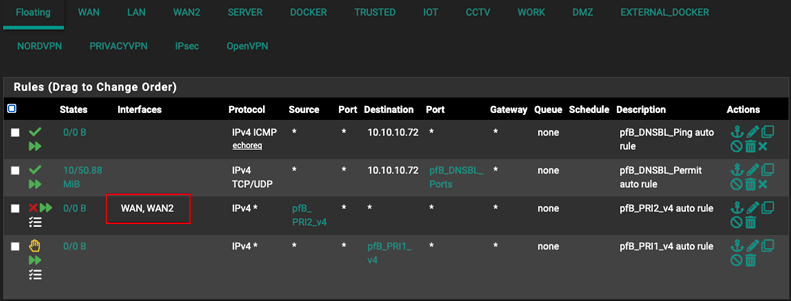
pfBlockerNG
The only change required for pfBlockerNG is to set the block rule to work on both WAN interfaces. By default, it is only assigned to the default WAN interface.
- Navigate to
Firewall > Rules > Floating. - Edit the block rule.
- Command/Control click to select multiple interfaces so that it includes both WAN interfaces.
- Save and apply the settings.
Failover Testing
Now, to explain why this guide took so long to release. I have had my second Internet connection for over two months and quickly stumbled across an unwelcome bug during failover testing.
There was a pfSense bug that was preventing the dynamic DNS service from picking up the new IP address. Thus, rendering a key portion of my failover setup useless.
The good news is that I wasn’t going crazy and that it has just been patched as of pfSense Plus 23.09, which was released on 6th November 2023.
Test Procedure
- Make note of your current public IP address.
- Trigger a failover by powering off your primary WAN’s modem or fibre ONT.
- Check the gateway status in
Status > Gateways. - Once the failover is complete, start checking your services for connectivity.
- Check your public IP address has changed, make a note of it.
- If using Dynamic DNS, verify that the IP address has been updated and that the sites are reachable.
- Browse the internet and run a speed test or two to confirm a usable connection.
Final Impressions
Is a WAN failover setup strictly necessary? No, but high availability is something I have been interested in for a long time. When the opportunity to run two Internet connections presented itself, I couldn’t resist.
Like I said earlier, I work from home and host several websites. In this case, I prefer paying a premium for a graceful failover instead of fiddling around with mobile hotspots and single Megabit speeds.
I am more than happy with the results since updating to pfSense Plus 23.09. I will be configuring a notification to alert me when a failover is triggered.
What this really does is open the door for testing multiple routers in a high-availability configuration.