Creating a Windows 11 Gaming VM in Unraid with Nvidia GPU Passthrough
I have been using a VM as my main gaming rig since March 2022, well over a year now. It originally started out as a Windows 10 machine before I took the plunge and upgraded in place to Windows 11.
In this guide, we will cover the general VM config required, including GPU passthrough settings and other nice to haves like RAW SATA disks, NVME passthrough, USB and Ethernet controllers.
This guide takes you through the required steps of configuring a gaming VM in Unraid, while covering what is being done and why. We are only focusing on Nvidia graphics card for now while the passthrough issues with the new AMD RDNA 3 cards are resolved.
Unraid uses the popular QEMU (Quick Emulator) as its virtualizer alongside the KVM kernel module in Linux to run Virtual Machines.
Prerequisites
A combination of motherboard and system settings. While in the BIOS it doesn’t hurt to verify that your memory is using the correct XMP (Intel) or EXPO (AMD) profiles. There is no point in leaving performance on the table.
- Enable IOMMU and VT-d in the motherboard BIOS. *
- Install the [Unassigned Devices](https://forums.unraid. net/topic/92462-unassigned-devices-managing-disk-drives-and-remote-shares-outside-of-the-unraid-array/). This plugin lets you manage disks that are outside the array by separately mounting them or passing them through. ***
- Configure devices for passthrough, detailed instructions are available later in the article.
- Download the official Windows 11 ISO.
- Save it to a share, the default
/mnt/user/isosis a good place.
*The settings names differ between Intel and AMD Platforms and some manufacturers.
**The graphics card is the only required device, the rest are nice to have and result in a better experience.
***These disks will exclusively serve as dedicated storage for this VM.
Optional - Single GPU Config
Follow this if you only have a single graphics card
Not all systems have integrated GPUs and common with pre AMD Ryzen 7000 series processors.
The following configuration isolates the graphics card and stops Unraid from initializing the device. You need to apply both.
1. Unbind VTConsoles and the EFI-Framebuffer
These entries unbind the VTConsoles and EFI-Framebuffer, edit this file /boot/config/go.
# Unbind VTConsoles and EFI-Framebuffer
echo 0 > /sys/class/vtconsole/vtcon0/bind
echo 0 > /sys/class/vtconsole/vtcon1/bind
echo efi-framebuffer.0 > /sys/bus/platform/drivers/efi-framebuffer/unbind
2. Stub the graphics card
The append entry is the older method of stubbing a device to mark it for passthrough. The efifb:off disables the
EFI/VESA framebuffer and stops the GPU from being attached. The xxxx:xxxx characters correspond to your GPU’s
device IDs, including its audio output, as seen under Tools > System Devices.
In the /boot/syslinux/syslinux.cfg file under the label Unraid OS section add the following:
append vfio-pci.ids=xxxx:xxxx,xxxx:xxxx initrd=/bzroot
video=efifb:off
The edited file should look like this.
label Unraid OS
  menu default
  kernel /bzimage
  append vfio-pci.ids=xxxx:xxxx,xxxx:xxxx initrd=/bzroot
  video=efifb:off
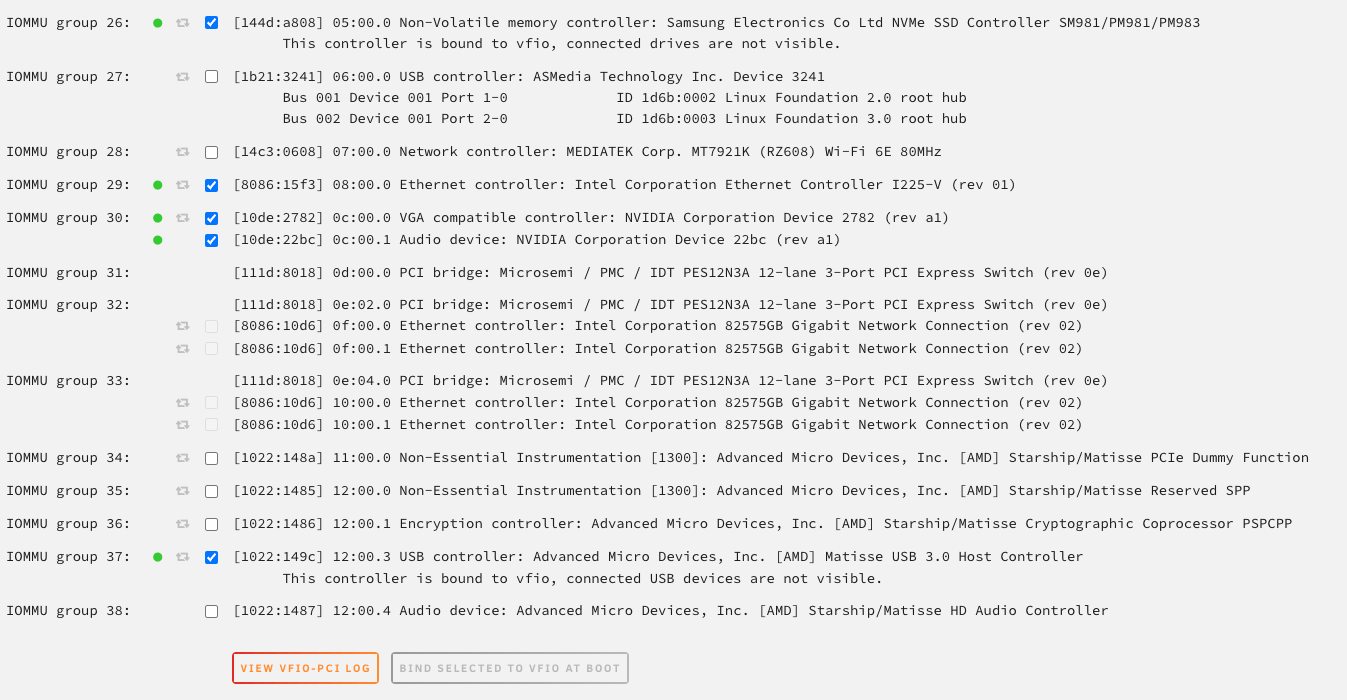
Unraid IOMMU Passthrough Config
Navigate to the Tools > System Devices menu in Unraid and select any devices you want to passthrough, save the settings by selecting Bind Selected To VFIO At Boot. A server reboot will be required for the changes to take effect.
Graphics Card
Select the graphics card you want to passthrough, this should automatically select its sound device, make sure both are selected.
NVME
Select any NVME disks you want available for passthrough, they will show up under the PCI Devices section in the Unraid VM config menu.
USB controller
Assuming your motherboard has more than one USB controller, I recommend passing it through to your VM. This approach is better and avoids assigning specific USB devices directly to the VM.
For example when using a USB switcher to share peripherals between multiple devices, changing devices no longer has the impact unceremoniously disconnecting your peripherals and causing the VM to panic or fail to start. Your USB peripherals are now treated the same as they would be on a bare metal machine.
Ethernet Controller
This is a good option if you have a separate NIC for the server and don’t want to run traffic over a virtual bridge interface, but not required. I wanted to avoid saturating my server’s primary network interface when transferring or downloading files.
GPU Preperation
Before configuring the VM we need to get our graphics card ready by dumping the VBIOS and optionally patching it.
Dumping the VBIOS - Mandatory
The guest VM requires a VBIOS file to initialize the graphics card. The recommended best practice is to dump the VBIOS directly from the card rather than downloading an archive copy. The latter runs the risk of using a different VBIOS version or even one designed for a different card. Be safe, don’t bork your card!
There are scripts out on the Internet that can dump the VBIOS from inside Unraid, however I have not been able to get one to work. The approach here depends on a second UEFI capable Windows machine to run the card and dump the VBIOS. *
- Download GPU-Z
- Click on the arrow and select Save to file.
- Take the saved ROM file and move it somewhere you can edit it.
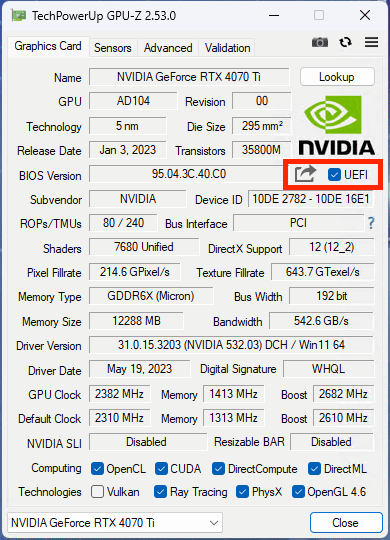
*I converted my original homelab to a test bench PC after building my new AMD servers.
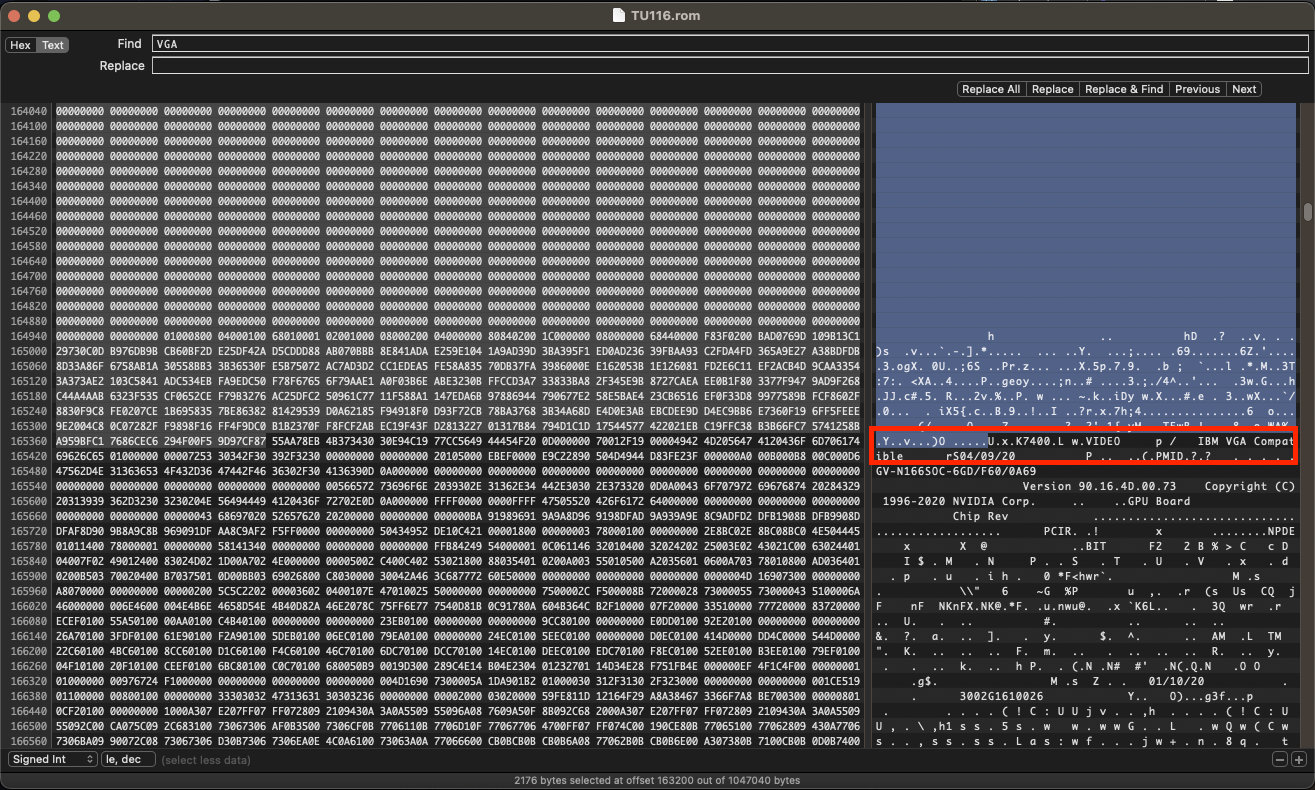
VBIOS Patch - Only if the GPU does not initialize
The original reason for patching the VBIOS had to do with Nvidia’s VM detection, which prevented consumer cards from
being used in virtual environments. The telltale sign is the dreaded Code 43 in Device Manager.
This is no longer strictly necessary for newer cards, letting us reference the original VBIOS exported in the previous step. Try using the original VBIOS first before proceeding with patching.
I recommend keeping copies and backups of these dumps, they come in useful for testing or reusing old hardware.
- Download a Hex editor HxD for Windows or Hex Fiend for macOS.
- Open the exported VBIOS file in a hex editor.
- Search for
VGA Compatibleas text, not Hex. a. You will find a block starting withU......VIDEO, the characters after theUwill vary. - Delete everything preceding the block starting with
U. - Save a new
file_name_edited.romfile.
VM Configuration
Configuring the VM is best done in two parts. The initial steps can be setup using the Unraid interface, however, there are more advanced options that are not available in the GUI and require editing the XML file.
Once you commit to using the XML interface, it is best to stick with it, or at least save changes when in the XML form view as the Unraid interface can undo some of these changes. I strongly recommend version controlling or at least storing copies of VM XML configuration.
Unraid VM Config Menu (GUI)
The majority of the configuration is done through the Unraid GUI and will be the case for the majority of users. Barring SATA SSD detection and experimental Resizable BAR config, there is no need to edit the XML file directly.
Create a new VM
- Select Add VM
- Choose the
Windows 11* template
*I upgraded my Windows 10 VM to Windows 11, but found it easier to import my XML into a new VM using the Windows 11
template. This was mainly because of the OVMF TPM config being automatically generated, retrofitting it didn’t
quite work.
Basic Config
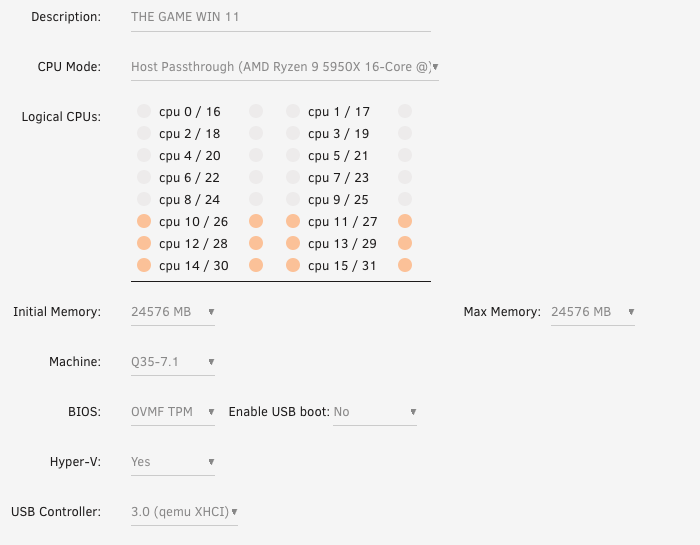
- Give your VM a name.
- Descriptions are nice.
CPU and Memory
With games getting larger and more demanding, I opted for six CPU cores and threads, for a combined total of 12, and 24 GB of memory. Try to use cores that are not assigned to other workloads.
- Leave the CPU Mode as
Host Passthrough (CPU NAME). - Assign the CPU cores/threads, making sure to leave cores available for Unraid and other processes.
- Set your memory allocation, I prefer static memory versus dynamic.
AMD CPU Isolation
My primary server uses the AMD 5950X 16-core CPU, which leaves lots of room for activities and plenty of headroom for the remaining Docker workloads. CPU isolation is recommended to get the most out of your workloads. As well as avoiding noisy neighbour scenarios where an application or VM consumes too much compute and prevents the rest from running normally.
Techpowerup.com has a good write-up on the Zen 3 architecture in its 5950X review.
A big change for Zen 3 was a change to the complex core dies (CCD) where a single CCD is made up of a single core complex (CCX) that contains 8 cores and a shared 32 MB L3 cache. The big difference when compared to Zen 2 is that each CCX can directly communicate with each other, and there is no longer a concern about calls being split between two physical L3 caches.
 AMD pairs its cores and threads, for example, 0 and 16, 1 and 17, and so on. This makes isolating the cores and
threads from a single CCX that much easier.
AMD pairs its cores and threads, for example, 0 and 16, 1 and 17, and so on. This makes isolating the cores and
threads from a single CCX that much easier.
In this case I have assigned cores 10 through 15 and threads 26 through 31, which are all located on a single CCX.
You want to avoid the performance penalty of assigning cores that are physically part of another CCX. Going back to Zen 2 this would have been more apparent since all the CCX communication had to be routed through an IO die.
 The final step is to allocate CPU resources for the VM hypervisor/emulator itself and isolate it from other workloads,
including the VM. This is done using the
The final step is to allocate CPU resources for the VM hypervisor/emulator itself and isolate it from other workloads,
including the VM. This is done using the <emulatorpin> block.
Below is what the final CPU configuration XML.
  <cputune>
    <vcpupin vcpu='0' cpuset='10'/>
    <vcpupin vcpu='1' cpuset='26'/>
    <vcpupin vcpu='2' cpuset='11'/>
    <vcpupin vcpu='3' cpuset='27'/>
    <vcpupin vcpu='4' cpuset='12'/>
    <vcpupin vcpu='5' cpuset='28'/>
    <vcpupin vcpu='6' cpuset='13'/>
    <vcpupin vcpu='7' cpuset='29'/>
    <vcpupin vcpu='8' cpuset='14'/>
    <vcpupin vcpu='9' cpuset='30'/>
    <vcpupin vcpu='10' cpuset='15'/>
    <vcpupin vcpu='11' cpuset='31'/>
    <emulatorpin cpuset='9,25'/>
  </cputune>
Intel CPUs
Older, non-hybrid, Intel CPUs can be pinned using the standard core-thread method above. Since they use a single die, there is no danger of splitting cores or cache across chiplets.
The new hybrid Intel CPUs have Linux kernel support. From that perspective, Unraid works just fine with Alder Lake CPUs and its successors. Regarding isolation, what makes the most sense to me and is an approach adopted in the Unraid forums is to pin the p-cores and threads to a VM, with saving the e-cores for the QEMU emulator.
BIOS and USB
- Set the Machine to
Q35-7.1* - Confirm the BIOS is set to
OVMF TPM. - Hyper-V should already be set to
Yes. - Set the USB Controller to
3.0 qemu XHCI.
*This should work in an ideal world, your mileage may vary by platform and hardware and will require further testing and reading.
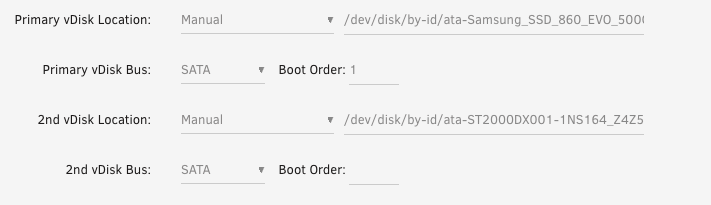
Disk Config
Creating a new VM will default to a vDisk using VirtIO stored in the domains share. There is nothing wrong with this configuration for general purpose Virtual Machines. However, if you are looking for near bare metal performance I recommend passing through a SATA SSD or NVME.
As mentioned earlier you will need to install the Unassigned Devices Unraid plugin.
- In the Main Unraid menu, under the Unassigned Devices heading, select settings icon for the unmounted SATA disk you want to passthrough.
- Select
Passed Throughoption and save. - Back in the VM config menu set the Primary vDisk Location to
/dev/disk/by-id/ata-DISK-IDENTIFIER-STRING, the disk ID can be found by selecting the disk in the Main panel in Unraid.
GPU Config
The passed through graphics card from earlier should now be available in the drop down.
- Select an available graphics card from the list.
- Select the VBIOS ROM file you extracted and edited earlier.
- Select the graphics card’s onboard sound device.

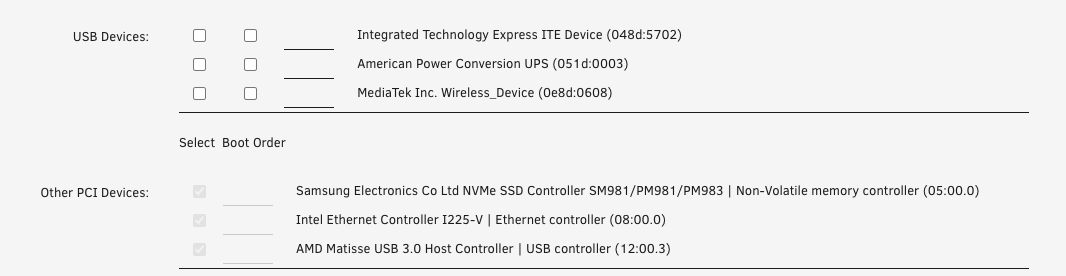
USB Devices
While none are configured in this case, this is where you enable the passthrough for USB peripherals* like a mouse and keyboard.
In my case I have passed through the whole USB controller with my peripherals connected that way.
*Please note that when passing through individual USB devices, they must remain connected in order for the VM to start.
PCI Devices
This list includes the PCI devices configured for passthrough earlier.
- NVME drive(s)
- USB controller
- Network interface
Additional XML Edits
Once you are happy with your VM configuration using the GUI there are a few optional choice edits to make switching to the Form View.
SSD Detection for RAW SATA Drives
Note that this only applies to SATA devices, NVME disks are natively detected as solid state.
Raw SATA drives added through the GUI are treated as rotational disks by default, the configuration adds the rotation_rate='1' flag to the <target /> block so the disk is detected as a SSD.
The disk section with the added rotation_rate flag.
<disk type='block' device='disk'>
    <driver name='qemu' type='raw' cache='writeback'/>
    <source dev='/dev/disk/by-id/ata-DISK-ID' index='INDEX-NUMBER'/>
    <backingStore/>
    <target dev='hdc' bus='sata' rotation_rate='1'/>
    <boot order='1'/>
    <alias name='sata0-0-2'/>
    <address type='drive' controller='0' bus='0' target='0' unit='2'/>
</disk>
Windows Installation
- In the VM config menu, select the ISO doownloaded earlier in the OS Install ISO section.
- Save and boot the VM.
- Follow the Windows 11 installation process.
VirtIO Drivers
- Find the VirtIO Drivers ISO option in the VM config menu.
- Select the Download option and select the latest VirtIO image.
- Mount it and boot the VM.
- Use the included drivers to update any unknown QEMU devices that appear in Device Manager.
Nvidia Drivers
- Download and install the latest Nvidia drivers for your graphics card.
- That’s it!
Monitoring and overclocking tools like MSI Afterburner work normally. As an aside it does look like MSI resolved the payment dispute with the Afterburner developer and recently issued an update that adds support for RTX 4000 series card.
Caveats and Limitations
No setup is ever going be perfect and while VM performance has come a long way, there are still some considerations that need to be made for some use cases.
Cable Connections
One can imagine that you may not want your Unraid server parked next to your desk. Mine is in a rack on the other side of the room. Fortunately there are solutions that do not require compromise on signal quality or functionality.
I have used the following cables:
- 10 meter optical DisplayPort cable.
- 10 meter optical HDMI cable,
- 10 meter active USB 3.0 cable feeding USB hub.
I will go into more detail during my upcoming Homelab tour.
GPU Power States
The simple solution is to always leave the VM running so that Windows and the Nvidia driver handle power state management. This resulted in lower consumption compared to shutting down the VM.
Passing through a graphics card is an all or nothing configuration, meaning that Unraid no longer controls the device and installing the Nvidia drivers is not an option. Shutting down the VM puts the graphics card into a default power state that is higher than being idled by the driver.
Nvidia Driver Updates
In some cases a graphics driver update might result in a black screen. The computer is still responsive, but with no display output. My workaround is to connect through Microsoft Remote Desktop to perform the driver update and gracefully reboot the VM.
This peculiar issue did not occur during my original installation and I don’t know the exact cause. It may or may not affect your installation. If I had to guess it has something to do with the multiple cards I have swapped in and out over the last year. A clean graphics driver installation did not resolve the problem.
Anti-Cheat
Anti-cheat is a known bugbear in the gaming VM community. While this is not something that I have encountered or had to deal with purely because of my game choice it is a limitation nonetheless. There are some workarounds to help obscure a VM from being detected, but I have yet to test these for myself and will be part of a future article.
In fairness this has nothing to do with the VM other than anti-cheat developers banning VMs as the laziest means of deterring hackers and cheaters. There has been little change in this area for enthusiasts, but platforms like Shadow and the Steam Deck have clearly made inroads to create anti-cheat exceptions for custom VMs and Linux environments.
Games Tested
This is not an exclusive list, but at least an indicator of single and multiplayer games that include both new and old releases. I haven’t tried CS:GO or any other known anti cheat games, simply because I do not play them.
- Shadow of the Tomb Raider
- Star Wars Jedi: Fallen Order Survivor
- Star Wars Jedi: Survivor
- DOOM
- World of Warcraft Classic
- Battlefield 4
- Grand Theft Auto V
- Satisfactory
- Space Engineers
Performance and Conclusions
The data here is mostly subjective and based on a few loose benchmark scores. I have run three graphics cards using this setup: GTX 1660 Super, RTX 3060 Ti, RTX 4070 Ti. Each has performed subjectively well, mildly overclocked, and scored well above average in 3DMark Time Spy.
I was able to get a consistent 60 fps back when I was using my older 4K monitor. Since upgrading to the Alienware AW3423DWF I have been unshackled from using VSync and made the switch to G-Sync, which has been absolutely glorious! Not to mention getting frame counts of anywhere between 100 to 140 fps.
The most important information to take away here is that performance on a gaming VM passes the sniff test, latency and frame pacing are not an issue, and it just works. I have not had any issues barring one QEMU updated in Unraid that changed the disk XML syntax, if anything has got better over time as I learn to extract more out of my setup.
More performance testing will happen down the line, but for now I encourage you to dig in and try for yourself!
Edited 9 November 2023 - Updated to include additional context around CPU pinning and isolation for AMD and Intel CPUs.