
The year was 2016, my Hackintosh setup had reached its peak with a fully stable desktop that did everything from benchmarking higher than my Windows 7 dual boot OS in addition to all the niceties of entering and exiting sleep properly.
I was feeling confident and had in my possession a spare motherboard and Intel i7 CPU. A machine was practically begging to be built.
Meanwhile, my day job had me administering a Windows Server stack and rolling out server deployments for customers. I needed room to play and couldn’t let my home setup down.
My initial goals for this server were:
- Double as a living room HTPC (home theater PC).
- Media server.
- Redundant disk storage.
- Room to grow and learn new IT skills.
Hardware and Software Specs
I started accumulating spare hardware shortly after building my desktop/workstation Hackintosh that was my everything design, audio, and video editing machine. It was a z68 chipset machine that I originally paired with an Intel i7 3770k only to learn that Sandy Bridge motherboards can’t overclock Ivy Bridge processors. I bought an Intel i7 2600k processor, with the 3770k now going spare.
All it took from there was a power supply, memory, storage, and case. I wanted to tuck the case into the TV cabinet and not look out of place.
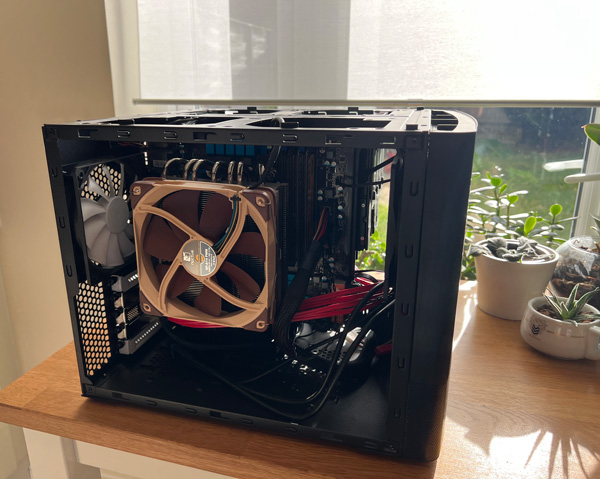
Hardware
- Motherboard: MSI Z77 MA-G45
- CPU: Intel i7 3770k
- Cooler: Noctua NH-C14S
- Case: Fractal Node 804
- HDD: HGST Deskstar 4TB, Western Digital Blue 4TB
- Boot SSD: 128GB Kingston SSD
Software
My memory might be a little hazy, but I am pretty sure I started on macOS, OS X as it was known back then, Yosemite and quickly upgraded to Sierra where it stayed until the end.
Emby ran as a bare metal install to serve my media library, coupled with a local installation of Kodi. The Emby library was accessed with additional Kodi clients dotted around the house.
macOS Server makes an appearance further down in this post.
The HTPC Cometh
My original plan was to use wake on USB to bring the computer out of sleep. I did also use the Kodi remote app and the Wake on LAN. This worked well, except for when it didn’t and soured the user experience. It mostly came down to macOS not coming out of sleep cleanly and hanging. I opted for the always on solution and haven’t looked back since.
The onboard HD 3000 GPU was more than enough to play back 1080p content over HDMI. In no small part thanks to the 3770k’s onboard H.264 hardware decoding chops via Intel QuickSync.
Media Server
I have been using Kodi since 2008 back when it was still called XBMC and up to this point used it to manage a local library, including all the content metadata tagging. Kodi is a robust and user-friendly playback solution, especially when paired with hardware acceleration capable platform. A recurring limitation I found myself running into every so many months was that the local library would become corrupt and would need to be rebuilt. Requiring me to repeat any manual corrections I had previously made.
It was around this time that a friend of mine, the same person that introduced me to the world of Hackintosh and early HTPC days, suggested I try out Emby. In particular pairing Emby with the Emby for Kodi add-ons. This leverages Emby’s powerful library management and curation tools and lets Kodi do what it does best.
Spoiler alert, barring a few tweaks, I am still using the same Emby and Kodi pairing today.
Storage
The days when 4 TB of space was “enough”.
While I may not hoard data to be worthy of legend on /r/DataHoarder, past Blag has been burned by data loss and swore right then and there “never again”. Side note, don’t buy cheap power supplies, unfortunately that’s all they had back in 2002.
This time around and armed with the current crop of Backblaze drive stats, I opted for two HGST Deskstar 4TB drives in a RAID 1 configuration. I eventually paired the array with another 4TB drive that functioned as a local backup.
The final touch was setting up a Backblaze personal backup on the machine, and just like that we have a rudimentary 3-2-1 backup solution.
Extras
This server gave me the chance to play around with the last gasp of macOS Server before Apple fully dropped support for the product.
It had its uses for setting up local DNS that I could use to run a IPSec IKEv2 VPN and SFTP for whenever I needed remote access.
I did briefly run a LAMPP stack using XAMPP, I did not care much for macOS Server’s built-in Apache server.
I did for a time run several Windows Server 2016 VMs using VMware Fusion, which in turn used nested virtualization to run a small set of Windows VMs when I was studying for a MCSA certification, it only makes sense that I use Linux now.
Coming Up In Part 2
And there you have it, my first pass at running an always on server.
In the next part we jump forward in time by five years and transition away from macOS to Unraid. There will be bench testing, exotic RAID configurations, and much more.
Stay tuned and thank you for reading!
